It is a fairly versitile pattern that is fun to arrange in many different ways.
The tutorial is going to show a two color variation but it is easy to add as many colors as you like once you have the basic block construction down. I could only get as close as a little over a 12 1/2 inch block...so it isn't exactly a 12 1/2 inch block. If that is what I might suggest taking an 1/8 of an inch off of the initial block and adjusting your measurements from there. If I try it again I will let you know the new increments.
Cut List
White:
(4) 2 1/4" Squares (Center Square)
(8) 1 1/2" Squares
(8) 1 1/2" x 3 3/8"
(8) 1 1/2" x 4 3/8"
Dark Blue:
(4) 1 1/2" x 3 3/8"
(4) 1 1/2" x 4 3/8"
(8) 1 1/2" Squares
Gray:
(4) 1 1/2" x 2 1/4"
(4) 1 1/2" x 3 3/8"
(8) 1 1/2" Squares
Directions:
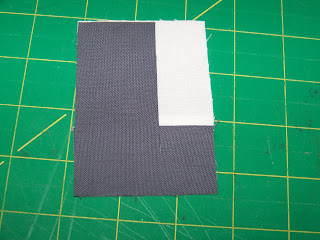
1. Take your 2 1/4" White Center square and pair it with your gray 2 1/4" x 1 1/2" Gray. With right sides together sew (I use a 1/4 inch seam throughout) and then press your seams open.
2. Take your 1 1/2" x 3 3/8" rectangle and add it to the left hand side so that it creates a letter "L" when placed on top. Stitch and press seams open.
I tend to do all of mine in one go so that I don't have to go back and repeat the directions from the beginning.
3. Now add your 1 1/2" x 3 3/8" Blue rectangle to the opposite side right sides facing making a letter "U". Stitch and press open.
4. Add your 1 1/2" x 4 3/8 rectangle to the top exposed white and press open. You should have a nice little square that looks like the picture below.
5. It is now exclamation point time! Take one of your 1 1/2" x 3 3/8 White rectangles and piece them to one of your Gray 1 1/2" Squares. Repeat with the Blue 1 1/2" Squares. I do all mine at one time so I end up with 8 total Exclamation points (4 of each color square).
6. Match up the small blue part of your exclamation point with the blue with the long blue side so that it extends your long blue line making it longer. Place the Gray exclamation point over the short blue side so it matches up with the gray on the other side of the blue. Pin in place, stitch, and press seams open.
7. Now you are going to make and another set of exclamation points with the long 1 1/2" x 4 3/8 White rectangles and your remaining colored 1 1/2" Squares. After you piece them all together add another white 1 1/2" Square to the top of your colored square.
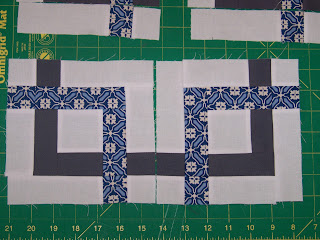
8. Line the Blue square of the exclamation point once again so it extends your shorter blue rectangle side. Add the gray to the opposite side so that it will match up with the long gray rectangle when pressed open. Pin, Sew, and Press. You should have a square/squares like you see below.
9. Arrange pieces as desired. And sew together. Add a border to finish off the mini or create more to make a larger quilt.
Enjoy. I hope I explained things well enough (let me know if I made a mistake - I am new at this). Also please let me know if you make one. I would love to see anything that is made from this pattern.


0 comments:
Post a Comment